# Object Instance Segmentation using TensorFlow Framework and Cloud GPU Technology
# 
In this guide, we will discuss a Computer Vision task: Instance Segmentation. Then, we will present the purpose of this task in TensorFlow Framework. Next, we will provide a brief overview of Mask R-CNN network (state-of-the-art model for Instance Segmentation). We also offer a demonstration on Mask R-CNN model using a jupyter notebook environment: Google Colab
# What is Instance Segmentation?
On the one hand, the Semantic Segmentation (SS) task is one of the Computer Vision task which consists in assigning to each pixel a label among a set of semantic categories.

Ultimately, it is intended to predict a segmentation mask that indicates the category of each pixel. These pixels are classified starting from high-quality feature representations. On the other hand, Instance Segmentation (IS) is based on Semantic Segmentation techniques. It permits to recognize each object instance per pixel for each detected object. These labels are maintained by instance.
The common applications and use cases that take place using the Semantic / Instance Segmentation task are the following:
- Autonomous navigation;
- Facial Segmentation;
- Categorizing clothing items;
- Precision Agriculture.
- Etc
For more details, you can look at two use cases related to Semantic Segmentation challenge:
**Use case 1: **Semantic Segmentation for Autonomous vehicles (opens new window)
**Use case 1: **Semantic Segmentation for Facial recognition (opens new window)
Examples of Instance Segmentation projects and tutorials:
Useful books for learning various aspects of Instance Segmentation:
- Practical Convolutional Neural Networks: Implement advanced deep learning models using Python: Here (opens new window)
- Deep Learning for Computer Vision: Here (opens new window)
# TensorFlow Framework for Deep Learning
TensorFlow (opens new window) is an integral open source platform for Machine Learning. It has a scalable and exhaustive environment consisting of tools, libraries and community resources that provide researchers and developers the ability to easily develop and deploy applications based on ML technology. The main features of TensorFlow are illustrated in the Figure below:

# Prerequisites
Before starting this guide, it is essential to be familiar with the basics of Python programming, Computer Vision concepts, Deep Learning Libraries (TensorFlow + Keras Framework), and OpenCV library.
# Guide map
The content of this guide will be organized according to the following map:
- What is Instance Segmentation?;
- TensorFlow Framework for Deep Learning
- An overview of Mask R-CNN model for Instance Segmentation;
- Using Google Colab with GPU (enabled);
- Mask R-CNN : Demonstration.
- References.
# An overview of Mask R-CNN model for Instance Segmentation
Thanks to Mask R-CNN, we can automatically segment and construct pixel masks for each object in input image. We will apply Mask R-CNN to visual data such as images and videos. Mask R-CNN algorithm was presented by He et al[1]. In fact, It builds on previous object detection works, by R-CNN (2013)[2], Fast R-CNN (2015)[3] and Faster R-CNN (2015)[4] respectively. Mask R-CNN not only generates the bounding box for a detected object, but also generates a predictive mask.
Mask R-CNN model is based on Faster R-CNN architecture with 2 major contributions:
- Replacement of the ROI Pooling module by a more precise module named ROI Align;
- Inserting an additional branch from the ROI Align module.
This additional branch takes the output of the ROI Align and then sends it into two convolution layers (CONV). The output of the convolution layers (CONV) is the predicted mask itself. In the following figure, we can see the block diagram of Mask R-CNN:
# Using Google Colab with GPU (enabled)
Google Colab has been developped to facilitate collaboration between Machine Learning professionals in a more transparent way.
Sign in to your Google Gmail account in the top right corner, if you haven't already done so. It will ask you to open it with Colab at the top of the screen. Then you will make a copy so that you can edit it.

It is now possible to click on "Runtime" menu button to select the Python version and use GPU/CPU device to speed up the calculation.

Now, everything is ready for the environment.
# Verification that TensorFlow is able to detect the GPU device:
Just select "GPU" from the Notebook Settings Accelerator drop-down menu (via Edit menu or cmd/ctrl-shift-P command).
Execute this psedo-code to confirm that TensorFlow can detect the GPU:
import tensorflow as tf
device_name = tf.test.gpu_device_name()
if device_name != '/device:GPU:0':
raise SystemError('GPU device is not detected')
print('Detected GPU at: {}'.format(device_name))
It's coming out:
Found GPU at: /device:GPU:0
If you are interested in the type of GPU being used. It's a Nvidia Tesla K80 with 24G of memory. Quite powerful.
Run this code to find out for yourself.
from tensorflow.python.client import device_lib
device_lib.list_local_devices()
It's coming out:
physical_device_desc: "device: 0, name: Tesla K80, pci bus id: 0000:00:04.0, compute capability: 3.7"]
# Mask R-CNN : Demonstration
This section provides an implementation of Mask R-CNN on Keras+TensorFlow Framework.
# 1. Installing dependencies and running the demo
Mask R-CNN has some dependencies to install before you can run the demo. Colab allows you to install Python packages via the pip command, and general Linux packaging/libraries via the apt-get command.
In case you haven't heard yet. Your current instance of Google Colab runs on an Ubuntu virtual machine. You can execute almost all the Linux commands that you usually do on a Linux machine.
Mask R-CNN depends on pycocotools (opens new window) package, you can install it with the following commands:
!pip install Cython
!git clone https://github.com/waleedka/coco
!pip install -U setuptools
!pip install -U wheel
!make install -C coco/PythonAPI
It clones GitHub's repository. Install the compilation dependencies. Finally, compile and install the coco API library. All this happens in the cloud virtual machine quite quickly.
You are now ready to clone the Mask R-CNN directory of GitHub and access into this directory.
!git clone https://github.com/matterport/Mask_RCNNN
# cd to the reference directory and possibility to download the pre-trained weight.
import os
os.chdir('./Mask_RCNN')
!wget https://github.com/matterport/Mask_RCNNN/releases/download/v2.0/mask_rcnn_coco.h5
Note that you change directories with the Python script instead of executing a cd shell command since you execute Python in the current notebook.
Now you can run the demo of Mask R-CNN on Colab, as you would on a local machine.
Follow the below Python codes in order to familiarize yourself with the use of a pre-trained model for detecting and segmenting objects. All psedo-codes will be commented on.
#import of the necessary packages
import os
import sys
import random
import math
import numpy as np
import skimage.io
import matplotlib
import matplotlib.pyplot as plt
import coco
import utils
import visualize
%matplotlib inline
# Root directory of the project
ROOT = os.getcwd()
# Directory to save the trained model and logs files
MODEL= os.path.join(ROOT, "logs")
# Local path to trained weights file
COCO_MODEL = os.path.join(ROOT, "mask_rcnn_coco.h5")
# Download COCO trained weights
if not os.path.exists(COCO_MODEL): utils.download_trained_weights(COCO_MODEL)
# Image directory to be detected
IMAGE = os.path.join(ROOT, "images")
# 2. Model configurations
We will use a model trained on the MS-COCO dataset (opens new window) (It is a large-scale object detection, segmentation, and captioning dataset). The model configurations are in CocoConfig class of coco.py file.
Make slight changes to the configurations depending on the task. To do this, subclassify the CocoConfig class and replace its attributes that you need to modify.
class InferenceConfig(coco.CocoConfig):
# Set the batch size to 1 as we will perform the inference on 1 image at a time. Batch size = GPU_NB * IMAGES_PER_GPU
GPU_NB = 1
IMAGES_PER_GPU = 1
config = InferenceConfig()
config.display()
# 3. Building models and importing trained weights
In order to create models and load trained weights , please type the following psedo-codes:
# Create model
model = modellib.MaskRCNN(mode="inference", model_dir=MODEL, config=config)

# Load COCO trained weights
model.load_weights(COCO_MODEL, by_name=True)
# 4. Data preparation: MS-COCO dataset
The model classifies objects and returns class IDs, which are integer values that identify each class. Some datasets assign integer values to their classes and others do not. For example, in the MS-COCO dataset, the "person" class is 1. IDs are often sequential, but not always. The COCO dataset, for example, has classes associated with class IDs of classes 70 and 72, but not 71.
To get the list of class names, you can load the dataset and then use the class_names property like this:
# Loading MS-COCO dataset
dataset = coco.CocoDataset()
dataset.load_coco(COCO_DIR, "train")
dataset.prepare()
# Print class names
print(dataset.class_names)
You have included the list of class names below. The name index of the class in the list represents its ID (first class is 0, second is 1, etc.)
# COCO Class names by indexes
class_names = ['BG','person','bicycle','car','motorcycle','airplane','bus','train','truck','boat','traffic light']
# 5. Starting object detection process
To perform object detection, just type the following psedo-codes:
# Loading a random image from the dataset

file_names = next(os.walk(IMAGE))[2]
image = skimage.io.imread(os.path.join(IMAGE, random.choice(file_names)))
# Running object detection
results = model.detect([image], verbose=1)
# Evaluating results
r = results[0]
visualize.display_instances(image, r['kings'], r['masks'], r['class_ids'],
class_names, r['scores'])
# 6. Customization of images to be segmented
You can download an image from a third party website such as:
You can download your image using wget command.
# Loading a random image from the dataset
file_names = next(os.walk(IMAGE_DIR))[2]
image = skimage.io.imread(os.path.join(IMAGE,'my_image.jpg'))
# Running object detection
results = model.detect([image], verbose=1)
# Evaluating results
r = results[0]
visualize.display_instances(image, r['kings'], r['masks'], r['class_ids'],
class_names, r['scores'])
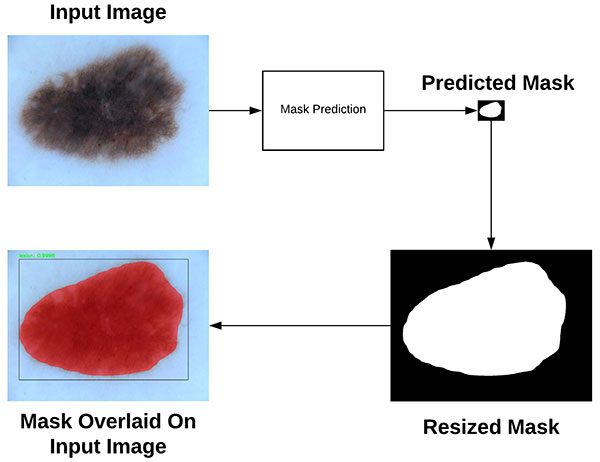
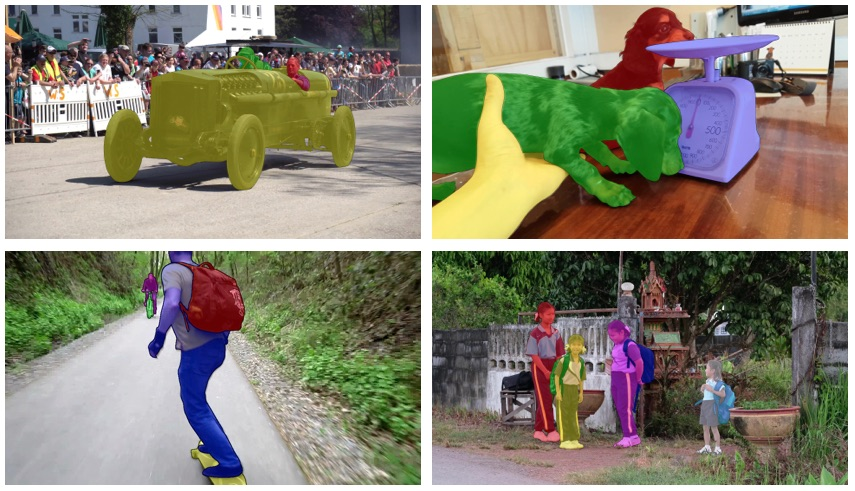
For example, the result of object detection and segmentation is shown below:
# 7. Video object segmentation
There are 3 steps to processing a video file.
- Transforming video frames into static images;
- Image processing;
- Converting processed images into output videos.
In our previous demo, we asked the model to process only 1 image at a time, as configured in IMAGES_PER_GPU option.
class InferenceConfig(coco.CocoConfig):
#  Set the batch size to 1 as we will perform the inference on 1 image at a time. Batch size = GPU_NB * IMAGES_PER_GPU
IMAGES_PER_GPU = 1
If we are going to process all the video at once, it will take a long time. We will therefore use the GPU to operate several frames simultaneously.
The Mask R-CNN pipeline is quite computationally intensive and requires a lot of GPU memory. In Colab, The Tesla K80 GPU with 24G of memory can safely process 3 images at a time. If you go any further, the notebook may crash in the middle of video processing.
Thus, in the psedo-code below, we set the batch_size to 3 and use the cv2 library to take 3 images at a time before processing them with the model.
capture = cv2.VideoCapture(os.path.join(VIDEO, 'demo.mp4'))
while True:
ret, frame = capture.read()
# Save each frame of the video to a list
frame_count += 1
frames.append(frame)
if len(frames) == batch_size:
results = model.detect(frames, verbose=0)
for i, item in enumerate(zip(frames, results)): frame = item[0]
r = item[1]
frame = display_instances(
frame, r['kings'], r['masks'], r['class_ids'], class_names, r['scores']
)
name = '{0}.jpg'.format(frame_count + i - batch_size)
name = os.path.join(VIDEO_SAVE_DIR, name)
cv2.imwrite(name, frame)
# For starting the next batch
frames = []
After running this psedo-code, you should now have all the processed image files in ./videos/save folder.
The next step is easy, you have to generate the new video from these images. We will use VideoWriter () function from OpenCV (cv2) to do this.
But there are two things you want to be sure of:
1. Images must be indexed in the same way
# Get all image file paths.
images = list(glob.iglob(os.path.join(VIDEO_SAVE,' *.*'))
# Sort the images by index.
images = sorted(images, key=lambda x: float(os.path.split(x)[1][:-3]))
2. The frame rate corresponds to the original video. You can use the following psedo-code to check it or simply open the file property.
video = cv2.VideoCapture(os.path.join(VIDEO_DIR, trailer1.mp4'));
# Get OpenCV version
(major_ver, minor_ver, subminor_ver) = (cv2. version).split('.'')
if int(major_ver) < 3 :
fps = video.get(cv2.cv.CV_CAP_PROP_FPS)
print("Frames per second: {0}".format(fps)) else :
fps = video.get(cv2.CAP_PROP_FPS)
print("Frames per second: {0}".format(fps))
video.release();
Finally, you can use this psedo-code to generate video from the processed images.
def generate_video(outvid, images=None, fps=30, size=None,is_color=True, format="FMP4"):

  """
Create a video from a list of images.
@param outvid output video
@param images list of images to use in the video
@param fps frame per second
@param size size of each frame
@param is_color color

"""
from cv2 import VideoWriter, VideoWriter_fourcc, imread, resize
fourcc = VideoWriter_fourcc(*format)
vid = None
for image in images:
if not os.path.path.exists(image):
  raise FileNotFoundError(image)
img = imread(image)
if vid is None:
  if size is None:
size = img.shape[1], img.shape[0]
vid = VideoWriter(outvid, fourcc, float(fps), size, is_color)
  if size[0] != img.shape[1] and size[1] != img.shape[0]:
img = resize(img, size)
vid.write(img)
vid.release()
return vid
import glob import os
# Image directory to be detected
ROOT = os.getcwd()
VIDEO = os.path.join(ROOT, "videos")
VIDEO_SAVE = os.path.join(VIDEO, "save")
images = list(glob.iglob(os.path.join(VIDEO_SAVE, '*.*')))
# Sort the images by index
images = sorted(images, key=lambda x: float(os.path.split(x)[1][:-3]))
outvid = os.path.join(VIDEO, "out_video.mp4")
generate_video(outvid, images, fps=30)
Once this step is completed, the segmented video should now be ready to be downloaded into your local machine.
from google.colab import files
files.download('videos/out_video.mp4')
# List of References:
[1] K. He, G. Gkioxari, P. Dollár, and R. Girshick, "Mask R-CNN", arXiv:1703.06870[cs], March 2017.
[2] R. Girshick, J. Donahue, T. Darrell, et J. Malik, « Rich feature hierarchies for accurate object detection and semantic segmentation », arXiv:1311.2524 [cs], nov. 2013.
[3] R. Girshick, "Fast R-CNN", arXiv:1504.08083[cs], Apr. 2015.
[4] S. Ren, K. He, R. Girshick, et J. Sun, « Faster R-CNN: Towards Real-Time Object Detection with Region Proposal Networks », arXiv:1506.01497 [cs], juin 2015.
# Other sources :
TensorFlow, https://www.tensorflow.org/
Keras, https://keras.io/